Generating and opening external help for blocks
Generating the external block help
logi.cals recommends to generate an external block help only after the block interface has been finalized.
How to generate the external help for a block by using logi.CAD 3:
In the project explorer, expand the object in which the block has been declared.
Open the context menu for the displayed sub-level item (= the created block).
Select the command Edit Help.
In the opened file, add the requested texts.
 This file is a Textile file. Information and examples for the possible syntax in Textile is specified under: https://textile-lang.com – This website also provides the possibility to immediately test your texts in the Textile syntax.
The file already contains automatically generated pieces of information, such as the POU name and a table with the in-/outputs. Do not delete or change these generated pieces because they will be automatically generated again, when you select the command Edit Help anew.Save the modified file.
If required (e.g. a function block or a function), create the block image for the help as follows:
In the interface editor, press Ctrl+Shift+P.
Close the interface editor again.
Open the context menu for the displayed sub-level item again and select the command Generate Help.
Result: The files for the HTML help (incl. the block image) are located in the folder .olh. This folder is located in parallel to the object and is not visible within the project explorer by default.
Observe the following:
If you do change the block interface after you have generated the block help (e.g. rename the block or you create new in-/outputs), you have to perform some steps so that the files for the HTML help are updated. Details: see "Updating the help files in case of subsequent changes of the base element"
It is possible to generate the block help in German and in English. In this case, best practice is as follows:
First, create the block help in one language (e.g. in English), as described above.
Exit logi.CAD 3
Start logi.CAD 3 in the other language.
Now, create the block help in second language (e.g. in German), as described above.
It is also possible to generate help for →interfaces. Subsequently, all instructions are analogously valid for the interface.
Alternative: You are also able to generate the external block help on your own by using your favorite tools to generate/edit the HTML-files. logi.CAD 3 just requires the appropriate HTML file in the corresponding folder. See "Ablage der Hilfedateien" for details on this.
Opening the external block help
How to open the HTML help for your own blocks in logi.CAD 3:
by using the command Show Help within the project explorer
Expand the object displayed in the project explorer.
Open the context menu for the displayed sub-level item (= the created block).
Select the command Show Help.
by using the F1-key in the appropriate editor
within the ST-editor: Position the text cursor on a call of a function or on a declaration of a function block and press the F1-key.
In order to display the help for a block declared in the ST-code: Position the text cursor on the appropriate lines with the declaration (e.g. FUNCTION_BLOCK name1 and END_FUNCTION_BLOCK) and press the F1-key.within the FBD-editor: Select the call of a function or of a function block and press the F1-key.
In order to display the help for the block currently opened: Select none of the elements within the FBD-editor and press the F1-key.
Filing of the help files
The files for the HTML files must be located either within the folder olh or within the folder .olh. Both folders must be located in parallel to the block for which the help files are destined. By default, the folder olh is visible within the project explorer but the folder .olh is not.
The name of a HTML help file for a block must be as follows:
|
Condition |
within the German logi.CAD 3 version |
within the English logi.CAD 3 version |
|
The block is declared within a →namespace. |
namespace_name.block_name.DE.html |
namespace_name.block_name.EN.html |
|
The block is not declared within a namespace. |
block_name.DE.html |
block_name.EN.html |
Examples:
For the function block F1 declared within the namespace N1, the help file is: N1.FB1.EN.html
For the function block F2 declared without a namespace, the help file is: FB2.EN.html
Overview on the search scope
The following overview illustrates where and in which order logi.CAD 3 is searching for the help file regarding the block MyBlock that has been declared in the namespace my.blocks.
The token XX in the graphic is replaced by the language identifier DE or EN that is used for the search. First, logi.CAD 3 searches for the help file in the language for which logi.CAD 3 has been started. If no help file is found, the search process starts again for English help files.
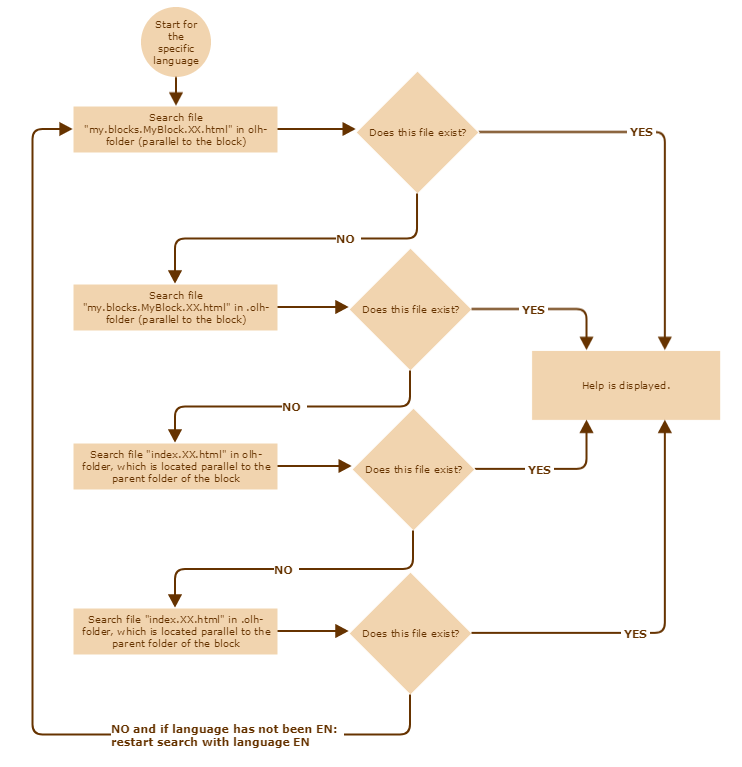
If logi.CAD 3 does not find any help file at all, the following message is output within the Error Log view: No help content for "Name" available.
Filing of the help files within custom libraries
If you are creating a custom library with blocks and you want to include the help files for the blocks within this library as well, mind that the help files must be filed within the library as described above for successfully opening the block help. See "Example: Creating library with blocks incl. help files" for more information.