Configuring Raspberry Pi
Note: Conclude each of the following command by pressing the Enter-key so that the corresponding action is executed.
Locally logging on to Raspberry Pi for the first time
Connect a monitor and a keyboard (USB) to the Raspberry Pi.
By default, the user pi with password raspberry is provided for each Raspberry Pi. Log on using this data.
login as: pipi@192.168.1.225's password: raspberryThe text raspberry for the password is not displayed in the terminal window. Take care that the English keyboard layout is activated in the basis configuration (e.g. y = z).
The Raspberry Pi might inform you that it is not configured completely.
Setting options for Raspberry Pi
Configure the boot behavior, the language/region settings and the timezone accordingly. For Raspbian versions since 2016, you have to manually activate the OpenSSH server.
Start the menu Setup Options to do so.
sudo raspi-configFrom this menu, select the following options – one after the other (navigate through the options by pressing the cursor movement keys, select an option by pressing the Enter-key):
Interfacing Options
Afterwards select SSH. Answer Yes to the prompt Would you like the SSG server to be enabled?Interfacing OptionsAfterwards select SPI. Answer Yes to the prompt Would you like the SPI kernel module to be loaded by default?
Boot Options and afterwards Desktop / CLI (for older Raspbian versions: Enable Boot to Desktop/Scratch)
Make sure that Console Text console, requiring user to login or Console Text console, requiring login (default) is selected.Localisation Options (
 – recommended setting)
Afterwards select Change Locale. Wait until the configuration dialog appears again (this might take some time). Then navigate through the list of locales until you find en_GB.UTF-8 UTF-8. Make sure that en_GB.UTF-8 UTF-8 is selected. If not, press the Space-key to select en_GB.UTF-8 UTF-8 and the Enter-key to accept the selection. In the following prompt, select en_GB.UTF-8 UTF-8 as default locale. Wait again until the configuration dialog appears again (this might take some time).Localisation Options
Afterwards select Change Timezone. Wait until the configuration dialog appears again (this might take some time). In the following list, select the geographic area (e.g. Europe) and afterwards the city or region (e.g. London).
After this configuration, close the menu Setup Options by selecting Finish. Answer No to the question whether to reboot.
Entering password for user "root" and activating user "root"
Enter a reasonable password for the "super user" root so that only you (as this user) will be able to access the Raspberry Pi.
sudo supasswdYou must enter the password twice – once for the definition and once for the confirmation.
root is a super user because root may execute all actions on the Raspberry Pi – even "dangerous" actions. Therefore, only perform the steps as specified in this tutorial (no other actions) so that the Raspberry Pi will not be damaged or become beyond repair.
For Raspbian versions since 2016, root must be activated.
Open the file sshd_config in a text editor.
 The tutorial uses Nano to change files. Of course, you may use your favored text editor.
nano /etc/ssh/sshd_configChange the file sshd_config and save the changes.
Original linePermitRootLogin without-passwordChanged and new lines#PermitRootLogin without-passwordPermitRootLogin yesSave the changes and exit the editor: Press Ctrl+O (and confirm the file name), then press Ctrl+X.
Restart the SSH server.
service ssh restart
Enter a constant IP-address for Raspberry Pi
Enter a constant IP-address for the Raspberry Pi so that the Raspberry can be addressed via the same IP-address at any time (e.g. without DHCP).
Open the file dhcpcd.conf in a text editor.
nano /etc/dhcpcd.confAdd the details within the file dhcpcd.conf.
Exampleinterface eth0static ip_address=192.168.1.225static routers=192.168.0.254static domain_name_servers=192.168.0.254 8.8.8.8Additional information:
Best practice is to use the command ip link in order to find the details of the interfaces on your system.
Previous versions of the Raspberry Pi operating system used the file /etc/network/interfaces for the network interface configuration. If an interface is defined within this file /etc/network/interfaces, these definitions take precedence over the ones within the file /etc/dhcpcd.conf.
Save the changes and exit the editor: Press Ctrl+O (and confirm the file name), then press Ctrl+X.
Updating Raspberry Pi
Update the Raspberry Pi regarding some addon programs that are required for steps later on and for executing logi.RTS.
apt-get updateapt-get install dos2unixapt-get remove wolfram-engineNote: The program Mathematica is de-installed as it prevents the execution of logi.RTS.
Load the communication buses for SPI and I2C.
Open the file raspi-blacklist.conf in a text editor, change this file (if necessary) and save the changes.
nano /etc/modprobe.d/raspi-blacklist.confOriginal linesblacklist spi-bcm2708blacklist i2c-bcm2708Changed lines# blacklist spi-bcm2708# blacklist i2c-bcm2708In detail:
Enter the character # at the beginning of the above 2 lines so that they are commented out.
Save the changes and exit the editor: Press Ctrl+O (and confirm the file name), then press Ctrl+X.
Open the file modules in a text editor, change this file and save the changes.
nano /etc/modulesNew lines#SPI devicespi-dev#I2C devicei2c-devIn detail:
Enter the new lines at the bottom of the file.
Save the changes and exit the editor: Press Ctrl+O (and confirm the file name), then press Ctrl+X.
Restarting Raspberry Pi
Restart the Raspberry Pi in order to accept all changes made until now.
shutdown now -rConfirm the displayed messages and wait for about 1 minute.
Connecting to Raspberry Pi by using PuTTY
Use PuTTY for the following configuration/installation steps.
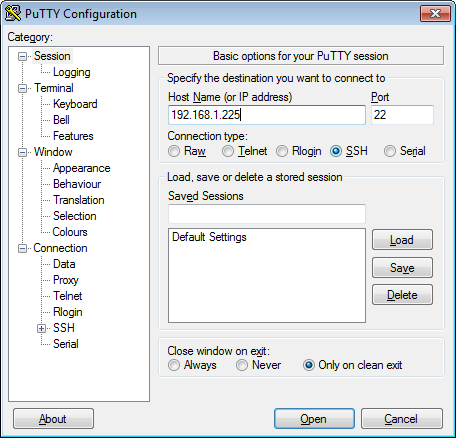
Start PuTTY.
In dialog PuTTY Configuration, enter the detected IP-address under Host Name, select SSH under Connection type, then click Open.
PuTTY displays a terminal window in which you have to enter certain commands – one after each other. Conclude each command by pressing the Enter-key so that the corresponding action is executed.
Logging on as user "root"
Log on as user root with the new password.
login as: rootroot@192.168.1.225's password: _new password for root_The text for the new password is not displayed in the terminal window
Check whether the communication buses are really loaded.
lsmodThe listed modules must include i2c_dev, i2c_bcm2708 and spi_bcm2708 (or a more current module).