Defining the team server
If you want to team up to create an application, logi.CAD 3 requires a team server on which the corresponding tools for the version management of the logi.CAD 3 projects are provided.
logi.CAD 3 supports the GitLab-Server as team server.
The following steps are required so that GitLab Server can be used as team server:
Setting up the team server (= putting it into operation)
Appropriate experience and prior knowledge are required for setting up a team server.
Follow the instructions under: https://docs.gitlab.com/ee/install/docker.html
For "Gitlab Server as SaaS", the best place to find out more about the current options is to visit; https://about.gitlab.com/pricing/
Configuring the team server
Appropriate experience and prior knowledge are required for configuring the team server. The following instructions contain pointers to assist you in this configuration.
On the team server, the following is required per team member:
an account on the team server
a valid SSH key of the type RSA 1024 bit that is loaded as public key on the account
an access token of the type api for the account
Creating the account
Refer to the documentation of GitLab Server to learn how to create an account for the team member (the user) in the team server. If you are unsure, contact the team server administrator.
Creating the valid SSH-key
Make sure that the HOME folder is set for the operating system user and that it is not read-only.
Example: Start a command prompt and enter the command set home. The displayed lines must specify a folder for which the team member has write privileges.Example for the displayed linesC:\>set homeHOMEDRIVE=C:HOMEPATH=\Users\TheoTestHere, the HOME folder is: C:\Users\TheoTest
In this HOME folder, create a subfolder .ssh for which the team member has write privileges.
Create the SSH key of type RSA 1024 bit as follows:
In logi.CAD 3: Open the preferences and go to group General – Network Connections – SSH2.
In General tab: Make sure that the .ssh subfolder of the HOME folder is entered under SSH2 home. Example: C:\Users\TheoTest\.ssh
Go to Key Management tab and click Generate RSA Key...
Result: A key is generated and displayed in the field below.Also in Key Management tab: Enter the email address of the team member in the Comment field and leave the Passphrase field empty. Then click Save Privaten Key..., answer the prompt to save the key without passphrase protection by clicking OK, select the .ssh folder in the dialog to save the key and enter a unique file name, e.g. id_rsa_IDE_TeamServer
 The dialog suggests the file name id_rsa. Use this file name only if no other file id_rsa exists in the .ssh folder yet. In this case, there are already SSH keys for other purposes that you would overwrite.
Confirm the information that the key has been saved by clicking OK.
Result: The new files have been created in the .ssh folder. The new key is automatically entered in the Private keys field of the General tab.Back in Key Management tab: Copy the public key that is displayed in the field under Generate RSA Key... to the clipboard.
Click Apply and Close.
Register the SSH public key with the team server:
Connect to the team server, i.e. the GitLab server, in a web browser and log in there as the respective team member.
Open the preferences for the user (= Preferences command provided for the user icon in the upper right corner).
Select SSH Keys (in the left list under User Settings).
Paste the copied public key from the clipboard into the Key field and click Add key.
If the contents of the clipboard have been overwritten in the meantime, you will find the public key in the new file with the extension .pub that has been created in the .ssh folder. Example: id_rsa_IDE_TeamServer.pub
Creating the access token
Connect to the team server, i.e. the GitLab server, in a web browser and log in there as the respective team member.
Open the preferences for the user (= Preferences command provided for the user icon in the upper right corner).
Select Access Tokens (in the left list under User Settings).
Enter any (not yet used) name under Token name, delete the entered date under Expiration date, check api under Select scopes and click Create personal access token.
Result: The Your new personal access token field displays the access token.Copy this access key to the clipboard to enter it later in logi.CAD 3.
Also, keep the access token in a safe place, as the access token will not be visible on the team server at a later time. However, if the access token is lost, you can generate a new access token as described above.
Defining data for the team server per logi.CAD 3 version
You require the following data so that logi.CAD 3 is able to access a GitLab server:
the server URL of the team server
the user name of the team member
the access token that has been copied to the clipboard according to the description "Creating the access token"
optional: the e-mail address of the team member
You must define the data in each logi.CAD 3 version that should be used for working in the team.
How to define the data within the preferences:
In logi.CAD 3: Open the preferences and go to group Team Server.
Select Gitlab Server as server type and enter the data in the appropriate fields.
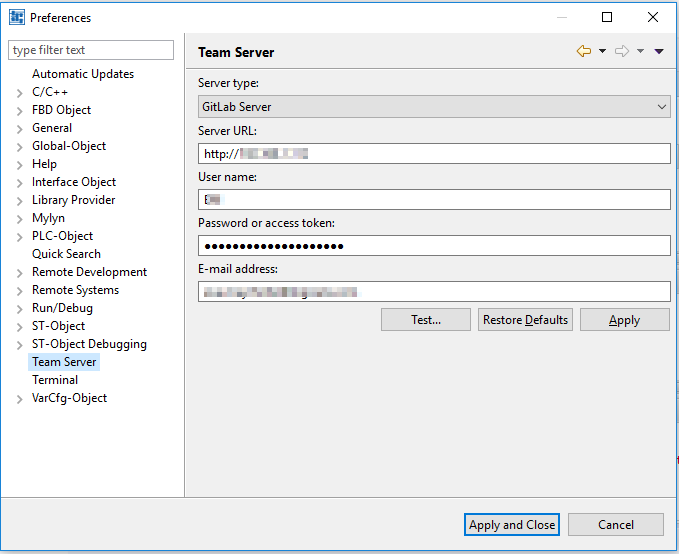
Click Test... in order to test the access to the defined team server.
If the access is successful, click Apply and Close.
If the access is not successful, make sure that the SSH key is specified under General – Network Connections – SSH2, tab General as it has been created according to the description "Creating the valid SSH key". If the data is entered correctly, the best practice is to contact the administrator of the team server or logi.cals to get support in the definition of the team server.