Tutorial: Creating a vendor block
This tutorial describes how to create a →vendor block and how to use it in an existing application
:
Start logi.CAD 3. Detail: See "Starting the development environment and the runtime environment".
Create a new project based on the project template Counter (FBD). Details: See "Creating project "Counter"".
Go to the project explorer, navigate to the project folder src and create a new ST-object named my_add. Details: See "Creating new objects and folders".
Copy the following code, and paste it into the opened editor for the ST-object :
{CustomImplementation}FUNCTION my_add : INT{ ImplementationProperties ( functionHasCFile; ) }VAR_INPUTIN1, IN2 : INT;END_VAREND_FUNCTIONSave the changes in the ST-object.
In the system explorer, navigate to the folder src/src-code of the project and open the file lcfu___MY_ADD.c.
 By default, the folder src-code is not displayed in the project exlorer. Here is a quick way to go to this folder from within of
logi.CAD 3
: Open the context menu for the ST-object my_add and select the command Show in –
System Explorer. After the system explorer has been opened for the folder src, change into the subfolder src-code and double-click the file lcfu___MY_ADD.c.
By default, the folder src-code is not displayed in the project exlorer. Here is a quick way to go to this folder from within of
logi.CAD 3
: Open the context menu for the ST-object my_add and select the command Show in –
System Explorer. After the system explorer has been opened for the folder src, change into the subfolder src-code and double-click the file lcfu___MY_ADD.c.
In the opened editor for the file lcfu___MY_ADD.c: Replace the line /* Vendor Code */ by the following text:
LC_this->LC_VD_MY_ADD = LC_VD_IN1 + LC_VD_IN2;Save the changes and close the editor.
Back in logi.CAD 3: Open the FBD-editor for the program Counter, insert a call of the function my_add by using the Icontent assist and enhance the existing logic of the counter as follows:
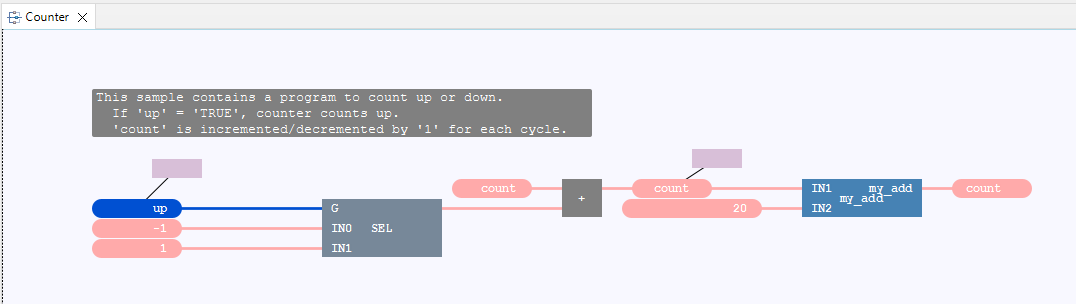
Save the changes in the FBD-editor.
Open the →perspective Application Testing, build and load the application onto the built-in PLC. Details: See "Transferring application to controller".
Test the application on the built-in PLC. Details: See "Testing application on controller".
See "Details: Creating a vendor block" for more information on creating vendor blocks and the required code.