Removing the namespace assignment and namespaces for objects
If all objects in the namespace folder should not be declared in a →namespace anymore, first remove the namespace assignment and then delete the namespaces within the editors:
Make the application navigator visible.
In the context menu of the namespace folder, select Unassign Namespace .
Result:The namespace folder is displayed as a regular folder with the icon
 within the application navigator.
If you create a new object in the folder, no namespace is in the new object anymore. When creating an object, the field Namespace name in the wizard is enabled again.
The namespace is kept for the existing objects. This becomes visible when the kept namespace is displayed in () behind the object name.
Example: The namespace assignment has been removed for myPOUs. But the namespace myPOUs is still entered in the objects Motor1 and Motor2.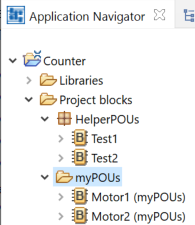
Open the respective editor for the object, delete the namespace entered in the editor and save the change:
In an ST-editor, delete the lines NAMESPACE name and END_NAMESPACE. Details on the syntax: See "Namespaces in ST: declaration".
In an FBD-editor, delete the namespace in the field Current namespaces (in the tab Namespaces). Details: See "Deleting/removing namespaces for a POU".
In an LD-editor, delete the lines NAMESPACE name and END_NAMESPACE – this change is only possible in a textual LD-editor. Details: See "Namespaces in LD".
If just one object should not be declared in a namespace anymore, first move the object into a regular folder and then delete the namespace within the editor:
If requested: Create a folder that is not a namespace folder. This is the regular folder.
Move the object from the current namespace folder into this regular folder. Details on moving: See "Moving resources".
Result: The namespace is kept for the object. This becomes visible when the kept namespace is displayed in () behind the object name again.As above: Open the editor for the object, delete the namespace entered in the editor and save the change.
![]() If you delete a namespace within an editor before you remove the namespace assignment or you move the object into a regular folder, logi.CAD 3 will report a deviation between the object (without the namespace) and the namespace folder in which the object (without the namespace) is located.
If you delete a namespace within an editor before you remove the namespace assignment or you move the object into a regular folder, logi.CAD 3 will report a deviation between the object (without the namespace) and the namespace folder in which the object (without the namespace) is located.