Modifying the Excel test suite, creating the test suite required for test execution
Opening and modifying the test suite in Excel
Open the Excel file from within logi.CAD 3 e.g. by double-clicking the Excel file within the project explorer.
The Excel file already contains these predefined worksheets:Title of worksheet
Purpose
Info
information on the author (incl. date), reviewer (incl. date), referenced documents
Change History
history of the changes
Excluded Req.
requirements for which a dynamic test is not possible
Defaults
defaults for stimuli – only possible, if the variable is not specified in the following worksheets (= test cases)
test testCase Name
defaults for the first test case with the default name test testCase Name
A test case consists of several test sequences (you may insert as many as you need). The test sequence specifies the input data and the expected outcome for the POU under test. Moreover, you are able to enter internal comments, requirements and descriptions per test sequence.Create only up to 5.000 test sequences per Excel file. This limitation is valid as sum all test cases.
In case of more test sequences, the optimal usage of the test framework cannot be guaranteed but the test execution might behave sluggishly.Enter up to 55.000 data per test case. Mind that the data is calculated as follows:
(input data per test case + expected results per test case) * test sequences per test caseIf you enter more data within a test case, the following message appears when the test case is executed: Test case contains too many test sequences and/or inputs/outputs
Workaround, if there are unspecified test sequences within the test case: Uncheck the setting Validate results for unspecified test sequences before you start the test.
Modify this Excel file according to your necessities.
Knowledge about working Microsoft Excel is essential for these modifications.
If a test suite contains special characters (such as umlauts, e.g. ä, ö, ü), these special characters are ignored when the test is running. Hence, best practice is to use only ASCII characters when creating/modifying the test suite .
Here a survey how you modify these worksheets:Complete the data in the existing worksheets Info, Change History and Excluded Req.
Complete the data in the existing worksheet Defaults, if a variable delivering input data is not specified in the test cases.
Here are the variables that are able to deliver input data for the test run:
local →variables (= VAR)
→input variables (= VAR_INPUT)
→in-out variables (= VAR_IN_OUT)
→external variables (= VAR_EXTERNAL)
See details under "Structure of the Excel test suite, modifying the worksheets" for the modification possibilities.Complete the data in the predefined worksheet that corresponds to the test case, e.g. within the worksheet test testCase Name.
logi.cals recommends to rename the worksheet to a significant name by using the Excel features so that you are able to uniquely assign the test case. Example: Testing Motor Ax3491
See details under "Structure of the Excel test suite, modifying the worksheets" for the modification possibilities.
Example 1: Excel file with test case for "ADD"
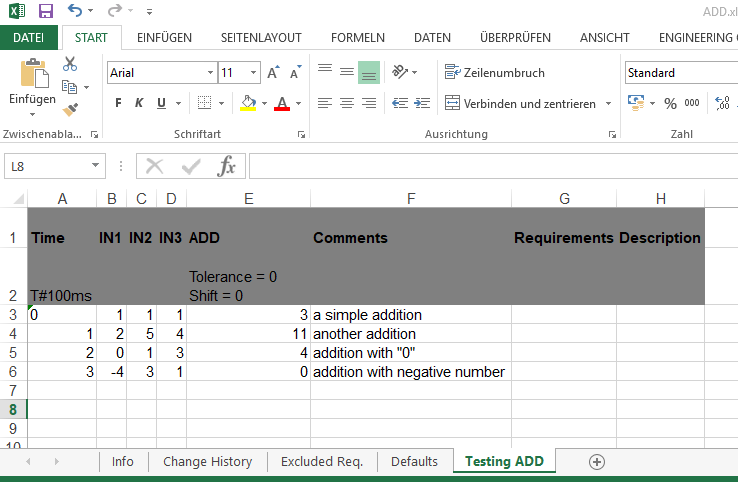
The following illustration displays the worksheet Testing ADD within an Excel file (opened in a German version of Microsoft Excel). This worksheet is one test case for an ADD block.

This test case specifies 4 test sequences (see column Time). The input data are entered in the column IN1, IN2 and IN3, the expected result (without a deviation) is entered in the column ADD. The comments will not be included within the test report.
Note: The columns for the inputs IN3 – IN15 of the ADD block are missing in this worksheet. But the default values for these inputs are entered in the worksheet Defaults.
Example 2: Excel file with test case incl. initial values for block outputs
The following illustration displays a test case for a counter function block for which initial values have been defined for outputs. Thus, the line Init has been inserted in front of the first test sequence .

Examples for counter
See "Example 1: Test case for counter" and "Example 2: Test case for counter with global/external variable".
Create the test suite based on the Excel file for the test execution
Save and close the modified Excel file.
Import the test suite that has been created as Excel file into the test project: context menu of the test project, command Import..., expand the category logi.CAD 3 Testframework and select Import Test Suite from Excel, click Next >, select or enter the Excel file, enter a name for the test suite file and click Finish
Result: A test suite file is created based on the Excel file. This new test suite file contains the tests for the POU.
If you do not need the validation of unspecified test sequences, uncheck the setting Validate results for unspecified test sequences within the properties of the project (context menu of the project, command Properties and Test framework).
See details under "Structure of the Excel test suite, modifying the worksheets", if you need information on the unspecified test sequences.