Migration wizard
The migration wizard assists you in migrating logi.CAD/32 projects/objects to logi.CAD 3 projects/objects.
Differences
Mind that the resulting logi.CAD 3 projects/objects will almost certainly differ from the logi.CAD/32 projects/objects in some aspects. See "Differences: Predecessor product to current product" and "Differences: System blocks in predecessor product to current product".
Content of this article:
Preparation
The following programs and frameworks must be installed on the computer that runs the wizard:
Microsoft .NET 5
The download is provided e.g. under: https://dotnet.microsoft.com/en-us/download/dotnet/5.0/runtime?cid=getdotnetcore – Select Download x64 under Run desktop apps.logi.CAD/32
logi.CAD 3
the migration toolchain com.logicals.tools.migration of logi.CAD 3 as well as the LC32Import tool of logi.CAD/32
Usually, these items are provided by the system integrator who provides the migration wizard as well. In this case, the installation folder of logi.CAD 3 contains these 2 additional folders: com.logicals.tools.migration and LC32Import
Condition before starting the migration
Before starting the migration wizard, start logi.CAD/32 and open the logi.CAD/32 project which you want to migrate. Best practice is to start logi.CAD 3 as well.
General procedure and advice
To successfully migrate a project, all its dependencies must be migrated first.
For example, if you want to migrate Project A which uses the Library Project B which in turn uses the Library Project C, start by migrating Library Project C, then migrate Library Project B and finally, migrate Project A.If there are circular dependencies between two library projects (e.g. Library B depends on Library C and Library C depends on Library B), try to resolve the dependencies. If that is not possible, one solution might be to merge the libraries into one common library.
It is possible to configure the migration wizard and its migration results. See the documentation "Administrator's Manual" for information about the configuration possibilities for the migration wizard.
Starting the migration wizard
Start the migration wizard by double-clicking the file MigrationWizard.exe in the folder where the file is located. Contact your system integrator where this file is provided.
Using the wizard
The wizard consists of 4 pages containing different settings that are needed for the migration.
Navigate through the pages by clicking the buttons Next Step (to go to the next page; this is only possible when you have successfully completed the settings on the current page) or Previous Step (to return to the previous page). The last page provides the button to start the migration.
When the migration wizard is closed when being on any page, there is a prompt to save the settings. If you choose to save the settings, the settings (incl. the migration progress) are saved in the logi.CAD/32 project. When the migration wizard is started again and when this logi.CAD/32 project has been opened, the saved settings are used for the migration wizard.
Project Settings
The first page of the migration wizard contains the project settings for the migration.
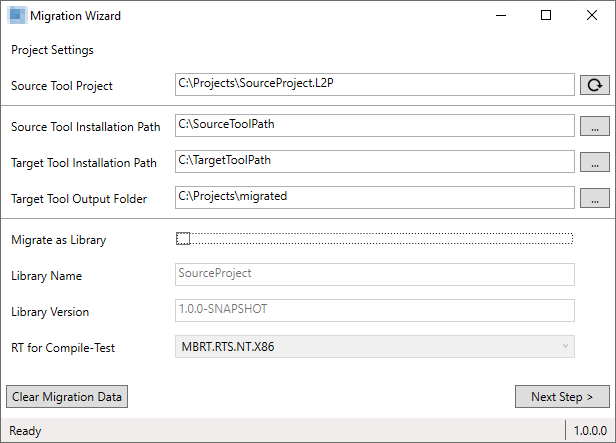
![]() The illustration displays the texts Source Tool and Target Tool. Depending on the configuration of the migration wizard, the texts logi.CAD/32 and logi.CAD 3 will be displayed instead.
The illustration displays the texts Source Tool and Target Tool. Depending on the configuration of the migration wizard, the texts logi.CAD/32 and logi.CAD 3 will be displayed instead.
Control or complete the following project settings:
logi.CAD/32 Project: This field displays the path of the logi.CAD/32 project which you want to migrate.
It is not possible to manually enter the path because the path is automatically read from logi.CAD/32. Click the button (on the right) to refresh this field, after you have opened a different project in logi.CAD/32.
logi.CAD/32 Installation Path: This field is automatically read from the opened logi.CAD/32 project as well.
However, if the migration wizard fails to read this setting, click the button (on the right) to browse for the installation path.
logi.CAD 3 Installation Path: Usually, this field is automatically read from the opened logi.CAD 3, if a valid migration toolchain com.logicals.tools.migration of logi.CAD 3 as well as the LC32Import tool of logi.CAD/32 have been provided.
However, if the migration wizard fails to read this setting, click the button
(on the right) to browse for the installation path.logi.CAD 3 Output Folder: Enter an existing folder to which the migrated project should be written.
Complete the library settings, only if you migrate a library project (= a logi.CAD/32 project that generates a logi.CAD 3 library):
Migrate as Library: At first, check the box to enable the following library settings.
Library Name: Enter the name of the logi.CAD 3 library to be created from the migrated project. The default value is the project name.
Library Version: Enter the version of the logi.CAD 3 library.
If a snapshot library is to be created, see "Arbeitsabläufe: Snapshot-Bibliotheken und/oder finalisierte Bibliotheken erstellen/verwenden" for information on the necessary suffix for the version number.RT for Compile-Test: Enter the compiler that is used to run the compile test and generate the C-Header files in the case of vendor blocks.
Contact your system integrator, if you need more information on what to specify in this field.
![]() Click Clear Migration Data only, if you want to clear all data in the migration wizard (settings incl. any migration progress that might have already been made). Observe that this clearing action affects this page as well as the following pages.
Click Clear Migration Data only, if you want to clear all data in the migration wizard (settings incl. any migration progress that might have already been made). Observe that this clearing action affects this page as well as the following pages.
When the data is cleared, the temporary migration data and all cache files are deleted from the logi.CAD/32 project. Subsequently, it will be necessary to recompile all POUs for the compile test (which needs to be performed on the 3rd page of the migration wizard). Depending on the number of the POUs, such a new compile test might take some time.
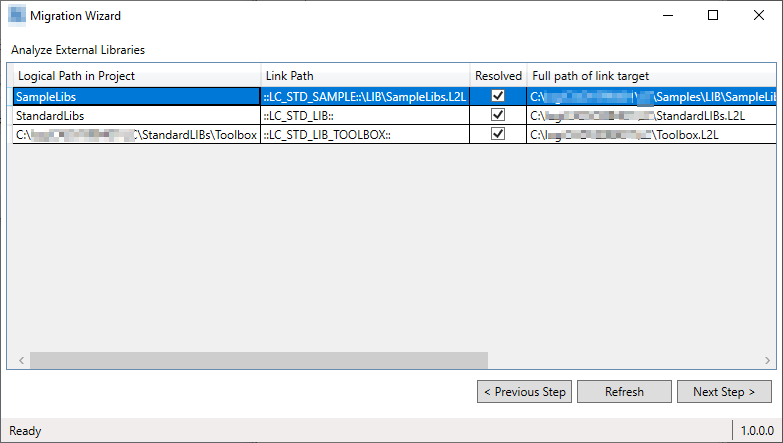
Analyze External Libraries
The second page of the migration wizard lists all links in the logi.CAD/32 project. Each link is tested, whether it can be resolved. If the link is a link to a library project, the migration wizard also checks, whether the library project has already been migrated.
Control the following columns:
Logical Path in Project: path of the link object in the logi.CAD/32 project
Link Path: path of the link target
Resolved: This box is checked, if the link can be resolved and is not broken.
 The box for all links must be checked.
Full path of link target: absolute path of the link target on the file system
logi.CAD 3 Library: contains the library name and version, if the link target is a library project
logi.CAD 3 Migration Data: path to the migration data folder that contains the XML-export-file and the library version of the link target
Status: the status of the link: OK or InError
All links must have the status OK so that you are able to go to the next page.Details: detailed information regarding the status
Moreover, this page provides the following buttons/commands:
Refresh: refreshes the data from logi.CAD/32
Click this button when you have added, removed or changed a link in the logi.CAD/32 project.Export to csv: exports the table data into a CSV-file
This command is provided in the context menu for the table.
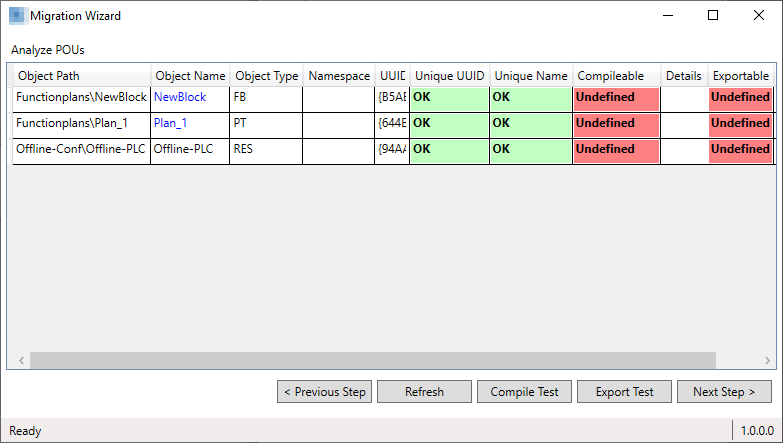
Analyze POUs
The third page of the migration wizard lists all POUs, data types and resources in the logi.CAD/32 project. Each object is checked. whether it has a unique name, a unique UUID (Universally Unique Identifier) and whether it is compilable and exportable. If duplicate UUIDs are found, the migration wizard allows the user to regenerate the UUIDs for the duplicates.
Control or complete the following columns:
Object Path: path of the object in the logi.CAD/32 project
Object Name: name of the object
This name is also a link to the logi.CAD/32 project. Click the name in order to open the object in logi.CAD/32.Object Type: type of the object
Namespace: →namespace of the object
 When the property LC3_Namespace (in tab More of the logi.CAD/32 object) contains a namespace, this namespace is entered here. Otherwise logi.CAD/32 does not support namespaces. As a consequence, this field might be empty at first. For the purpose of migration, you are able to enter a namespace for the object in this field. As an alternative, use the context menu command Generate Namespaces (see below) to generate the
namespaces for all objects.
When the property LC3_Namespace (in tab More of the logi.CAD/32 object) contains a namespace, this namespace is entered here. Otherwise logi.CAD/32 does not support namespaces. As a consequence, this field might be empty at first. For the purpose of migration, you are able to enter a namespace for the object in this field. As an alternative, use the context menu command Generate Namespaces (see below) to generate the
namespaces for all objects.
If the namespace is an invalid identifier for logi.CAD 3, the cell for this namespace is highlighted with a red background color.UUID: universally unique identifier of the object
Unique UUID: the status of the UUID: OK (if the UUID is unique), InError (if there are duplicates inside the project; in this case, the cell is highlighted with a red background color) or DependencyConflict (if there are duplicates between a project and its referenced libraries; in this case, the cell is highlighted with a dark-orange background color)
All fields must have the status OK so that you are able to go to the next page.
When objects are copied with the file system tools (instead of using logi.CAD/32), the UUID of the logi.CAD/32 object are accidentally duplicated. A project with duplicated UUID cannot be migrated.Unique Name: the status of the unique name (incl. the namespace): OK (if the name is unique), or InError (if there are duplicates inside the project; in this case, the cell is highlighted with a red background color) or DependencyConflict (if there are duplicates between a project and its referenced libraries; in this case, the cell is highlighted with a dark-orange background color)
All fields must have the status OK so that you are able to go to the next page. If the name (incl. the namespace) is not unique, specify a different namespace for the object in Namespace.Compileable: the status of the compile test for the object that has been executed by clicking the button Compile Test (see below): OK (if the compile test was successful), InError (if the compile test was not successful), NotApplicable (if no compile test is required for the object) or Undefined (if no compile test has been done yet)
All fields must have the status OK or NotApplicable so that you are able to go to the next page.Details: possible compile errors
Exportable: the status of the export test for the object that has been executed by clicking the button Export Test (see below): OK (if the export test was successful), InError (if the export test was not successful) or Undefined (if no export test has been done yet)
Details: possible errors that occurred during the export test
Used: the usage status of the POU: Yes (if the POU is used), No (if the POU is unused) or Undefined (if the compile test has not been executed for all resources yet or if a compile test was not successful).
Moreover, this page provides the following buttons/commands:
Refresh: refreshes the list from logi.CAD/32
Click this button when you have added, removed or changed a link in the logi.CAD/32 project.Generate Namespaces: enters an automatically generated namespace per object (already entered namespaces are overwritten); The generated namespace are →IEC-identifiers that are valid identifiers for logi.CAD 3.
This command is provided in the context menu for the table.
Th e automatically generated namespace are generated as follows:The POU is located under:
The generated namespace is:
not under a logi.CAD/32 configuration or resource
project-name
under a logi.CAD/32 library folder
project-name.library-folder-name
under a logi.CAD/32 configuration
project-name.configuration-name
under a logi.CAD/32 resource
project-name.configuration-name.resource-name
Compile Test: starts the compile test that is required before the actual migration can be executed
If the migration is done for a library project, all POUs are compiled. If the migration is done for an application project, all resources are compiled. If you want to abort a running compile test, click the button Cancel that is displayed next to the progress bar.Export Test: starts the export test that is required before the actual migration can be executed
When the export test is started, a prompt appears whether to export the complete project or each object separately. In case of a successful export test for an object, the text OK will be displayed in the field Exportable. Usually, the information about the successful export of specific objects is sooner available when exporting each object separately than when exporting the complete project. However, the export of all objects separately takes longer than the export of the complete project.
If you want to abort an export test running separately for an object, click the button Cancel that is displayed next to the progress bar. Also observe: If the export of the complete project fails, you are able to try to export each object separately.
Alternative to the export test for the complete project: button: D ouble-click the field Exportable for an individual POU, if the e.g. the text Undefined is displayed. If the export test for the POU was successful, the text OK will be displayed for this POU in the field Exportable .Export to csv: exports the table data into a CSV-file
This command is provided in the context menu for the table.Delete Unused POUs: deletes the unused POUs
This command is provided in the context menu for the table. This action is only possible after a successful compile test for all resources.
Migration
The fourth (and last) page of the migration wizard lists the log of the last migration. If there was no previous migration, the log is empty.
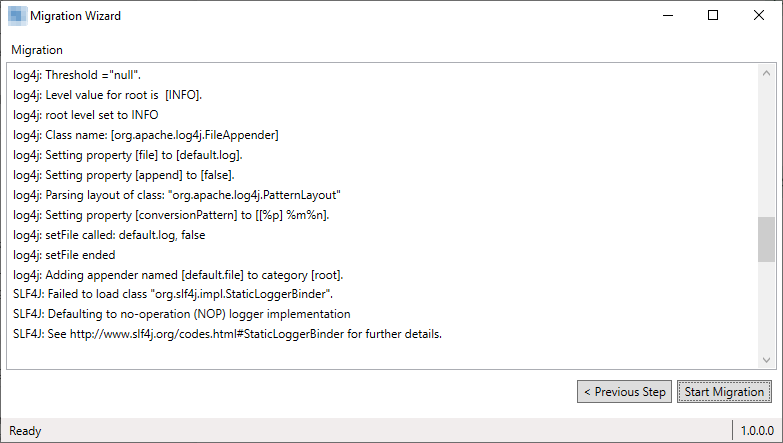
On this page, start the actual migration by clicking the button Start Migration.
If the migration is successful, the migrated project is written to the logi.CAD 3 output folder as specified on the Project Settings page. Already migrated projects (with the same name) are overwritten.